
 |
 |
 |
 |
 |
 |
 |
 |
Originally Published February 2007 in
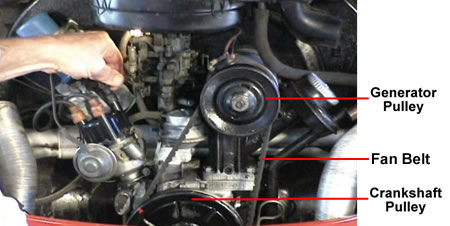
INTRODUCTIONWelcome to the second article in the VW-DIY series! This installment focuses on another of those VW jobs that is just as critical as it is easy to do: changing the fan belt. On our air-cooled Volkswagens the only thing cooling the engine down is...air. At the front of the engine (towards the front of the car) there is a large fan hidden by a metal shroud which, when spinning, provides a constant and crucial flow of cooling air . With the engine running the fan belt keeps this fan in motion. Should the belt break and the fan stop turning, the airflow is cut off and very quickly the engine overheats and will eventually seize. Being able to change and tighten a fan belt is as necessary a skill on our VWs as is filling a radiator on a conventional water-cooled vehicle. OVERVIEWThe fan belt loops between the crankshaft pulley (lower pulley) and the generator pulley (upper pulley). The crankshaft pulley provides the power, driving the fan belt which in turn spins the generator pulley. The generator pulley is attached to the generator (either a dynamo or alternator) via a shaft which connects the fan on its other end. When spinning, the generator pulley not only causes the fan to turn but also enables the generator to create electricity for the vehicle's electrical system. |
|
Fan Belt Circling The Pulleys |
Should the fan belt snap or become slack it will not longer turn the generator pulley resulting in the fan no longer spinning and the generator no longer generating electricity. In this situation the generator warning light on the dash will illuminate to let you know the generator is no longer functioning. This is the only warning you will get that your fan belt is gone so keep an eye on your gauges! If instead the light flickers on and off this could indicate a loose belt. Regardless of whether the light constantly on or flickering be sure to pull over as soon as safety possible, turn the engine off, and check the belt. Every second counts when your cooling system is no longer working. |
When a fan belt breaks or is too loose you will need to either change or tighten it. Everyone should keep a spare belt and the tools needed to change it in the vehicle at all times. If the belt snaps it will do it while you're driving and your only option will be a tow if you can't get the fan belt working. TOOLSThankfully, as with a lot of the all-important VW jobs, you can do this one with a fiver's worth of tools. All you need is a ratchet (a 1/2" drive ratchet is best), a spark plug socket, and a flat-nosed screwdriver. You can get by with spanner if you don't have a ratchet.. |
|
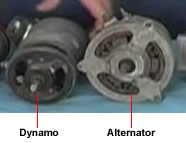
PARTSAll you need is a new fan belt, but make sure you get the right one! This is pretty straight forward. You need to know if you need the longer fan belt (11.3 by 902mm) or the shorter one (9.5 by 905mm). If you're running an alternator you'll need the larger belt. If you are running a dynamo you'll probably need the smaller one, but there are larger sized dynamos out there that take the same belt as the alternator.
A Dynamo Beside an Alternator If you're unsure, it is best to check with knowledgeable mates in the know or your local parts store. You may find a part number on your current belt which solves the problem! |
|
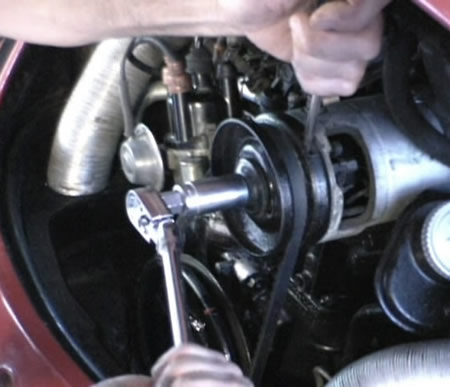
PROCEDUREStep I - Remove Generator Pulley FaceThe fan belt pulley is made up of two pieces held together by a large nut. These two pieces trap the belt between them. The tightness of the pulley is adjusted by adding or removing thin metal washers called shims between the pulleys, forcing the beveled edges either together or apart. Extra shims are stored under the nut securing the pulley in place.Around the round outside of the pulley you will find a small notch. To remove the pulley face, turn the pulley so the notch is to the top. Insert the screwdriver into the notch and it should catch on a screw sticking out behind the pulley. With the pulley now secured in place with the screwdriver, turn the nut counter-clockwise with your ratchet and remove it. Usually behind the nut there is a circular metal cover which may cover one or more metal washer-like shims. Just remove the nut, cover, and shims. You can now remove the front part of the pulley with your hands possibly persuading it a bit with the screwdriver. |
Ratchet & Flat-Nosed Screwdriver |
Step II - Install Fan BeltBefore you put on the new belt you need to guess how many shims to place between the two halves of the pulley. The more shims the looser the belt while conversely fewer shims mean a tighter the belt. If instead of replacing your belt you are only tightening it start by removing two shims to increase the tightness. Alternatively, if you are putting on a new belt it will probably be tighter than the old belt so add a few shims to compensate. This is a suck-it-and-see process so don't expect to get it right the first time! Replace the extra shims, the shim cover, and finger tighten the nut. Put the notch to the top again and jam it with your screwdriver so that you can tighten the nut with your ratchet. With the nut tight, check how tight the pulley is. The belt should only give about 1/2" of flex. Unless you managed to get it spot on, your belt will require tightening or loosening depending on how much play you find. If this is the case, go back to Step I and remove the pulley half again adding or removing shims as necessary. When you have the belt just right make sure that the securing nut is on good and tight.
|
A VW enthusiast for several years, Scott runs VW-DIY, the UK distributor for the "Bug Me Video" DIY DVD series. All photo and video samples used in this article are from that series. For more information on this or any products from VW-DIY please visit them online at www.VW-DIY.com. |


